How to Create & Track Goals in Universal Google Analytics
Google Analytics is no doubt the most sought after Web Analytics tool in the world. It offers a lot of data for free which helps in taking important decisions.
After setting up the tracking code on the website, we also need to create custom goals in order to track conversions on the website.
Steps on how to create Goals in GA?
- Head over to the admin panel (settings tab at the bottom left corner) and you will see the “Goals” tab in the View Section
- Note that you can create Goals in GA on the view level only. If you have multiple views in GA, you will need to create goals for each view
- Hit on New Goal button (You can create 20 goals in a single view)
- You can select any of the goals from the template or select the custom option and move ahead. The difference here would be template would give you pre-filled configurations.
- Hit Continue
- Here you will have to name your goal, this will reflect in your reports. Make sure to use a descriptive name, for example – if you are tracking leads – name the goal as “Thank you page Visits” or if you are tracking a button “Download Button Clicks”
- Hit Continue and fill out the goal details as per the type of your goal.
- You can assign a value to your goal depending on the Average Customer Value / Average Order Value or how much does a conversion is worth to you
- Use the “verify this goal” option to verify if the goal setup is correct and how much conversions it would give. This is just a basic check and would not give information if your pages are new or you are tracking clicks.
- Save the Goal and verify it in the Real-Time > Conversions tab
Common Goals that can be created
- Thank You Page Visits – this is used to track the number of users who filled out the inquiry or lead form. We need to create a “Thank You” page that will come after someone fills the form
- Brochure Download Buttons
- Add to Cart button clicks
- Clicks to Phone Number/Email
- Address Clicks
There are 5 categories in which the Goals can be created depending on what you want to track-

1. Destination –
This is simply used to track the number of visits to a page. This goal is widely used to track thank-you page conversions (the page that should come after someone fills out the contact us or lead form or after doing a transaction).
Implementation – In order to track this goal, add the value of the URLs in the Goal details tab, select regular expressions and paste the URL in the tab. (Only paste the URL starting after your domain here).
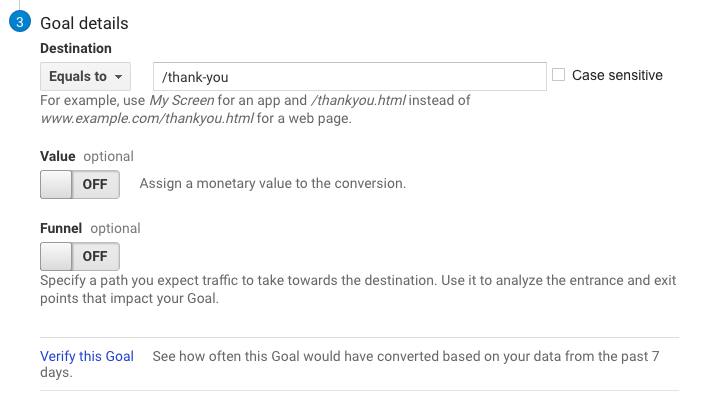
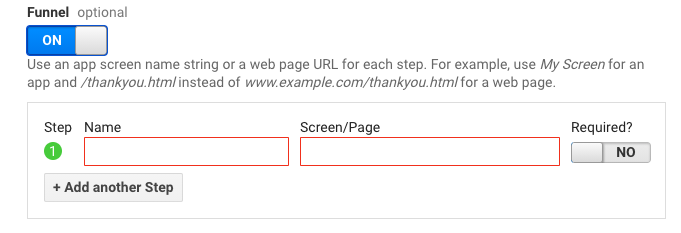
You can also create a funnel to track the user journey and progress. This will help us to track drop-offs happening at any stage of the funnel.
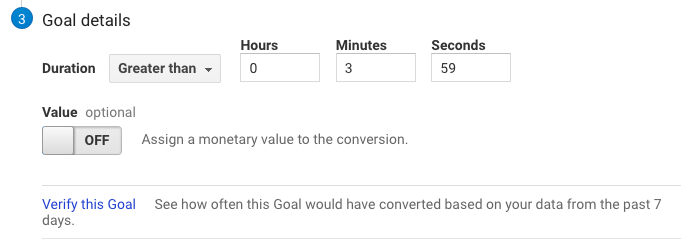
2. Duration –
This goal is used to track the time spent on your website. Let’s say if you want to consider someone spending more than X minutes on your website as a conversion, this goal can be used.
Implementation – In the Goal details tab select the minimum duration you want to track as a conversion in Hours/Minutes/Seconds. For example, if you want to track 4 minutes as the conversion, choose the duration as Hours=0 Minutes = 3 Seconds = 59
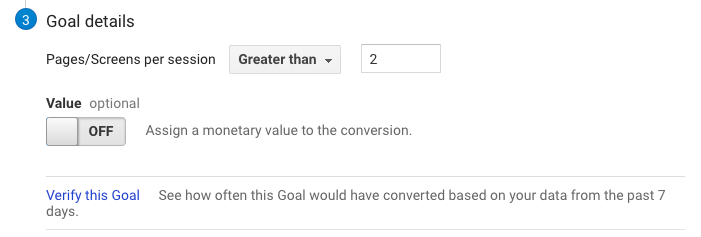
3. Pages/Screens per session –
If you want to track a certain amount of pages visited as a conversion per session, this Goal can be used. Take instance you have 5 pages on your website, if you know that out of these 5 pages if users visited more than 3 pages then it would be a conversion, you can use this goal type.
Implementation – In the Goal details tab, add the minimum number of pages/screens you want to track. If visiting 3 pages is a conversion, select the value as Greater than “2”
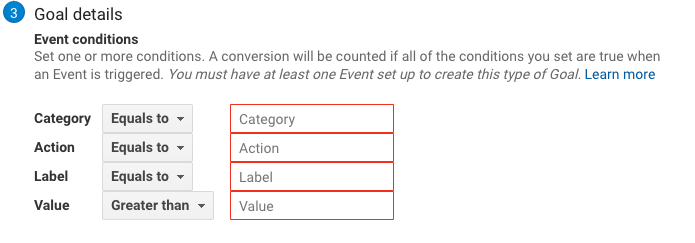
4. Event –
This is a widely used Goal to track events and interactions with your website. If you want to track clicks to a button, links, interactions, etc. on a page this goal should be used. Downloads, mobile ad clicks, gadgets, Flash elements, AJAX embedded elements, and video plays are all examples of actions you might want to measure as Events.
Implementation – There are 2 ways to track this goal:
1. Adding a piece of HTML code
2. Through GTM
1. adding a piece of HTML code on the button you want to track.
Add this piece of code on the button you want to track
ga('send', 'event', [eventCategory], [eventAction], [eventLabel], [eventValue]);
Here the values in the square brackets [ ] need to be replaced with some meaningful words and you will have to add the exact values in the goal details tab –
A code to track “Clicks on the Phone Number” would look like this –
ga('send', 'event', 'Phone no.', 'Click');
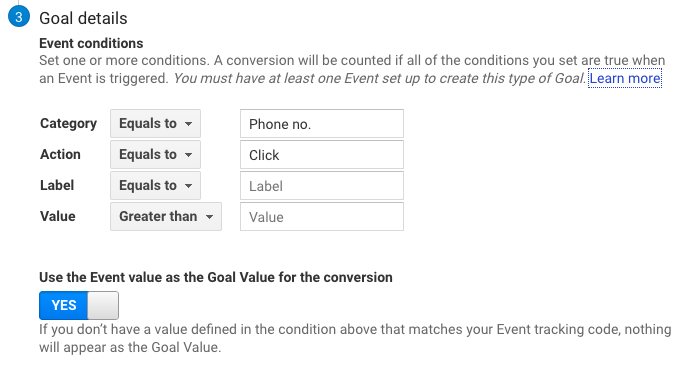
Things to note here is –
- The Label & Value tabs are optional
- We can make this event as non-interactive by adding this – “nonInteraction: true”
- The values are case sensitive (add them as it is)
2. Adding through GTM can be read here – https://www.optimizesmart.com/event-tracking-in-google-tag-manager-v2-complete-guide/
5. Smart Goals –
Measure the most engaged visits to your website and automatically turn those visits into Goals. Then use those Goals to improve your Google Ads bidding. Learn more
How to create this Goal – This goal can be used only after certain users land on our website through Google Ads. Although this Goal is rarely used
To sum up, creating goals in Google Analytics is quite easy and the data it provides is immense.
Let us know your thoughts in the comment section.