How to Upgrade or Setup Google Analytics 4 on your Website
Google Analytics is a free web analytics tool offered by Google to help markers analyze website and app traffic, track users’ journeys, and measure conversions from the SDKs/app/website. Google Analytics plays a key role in business decision making as it is the best tool that gives you all detailed information about the visitors.
Over the years Google analytics has evolved a lot and the team took all the effort to provide marketers with accurate and valuable insights from the users landing, navigating & converting on their website.
Google Analytics came up with several improvements in its current tracking structure. By taking one step ahead Google analytics came up with the biggest update since the last 15 years of existence called GA4.
Google analytics has used all the latest technologies and data to create GA4 which is perfect for future generations. GA4 is not just an updated version of Universal Analytics it is a completely new way of tracking data.
Below I have mentioned the difference between Universal Analytics and GA4.
Difference between Universal Analytics and GA4
1. GA4 uses customer-centric measurements that allows marketers to understand how users interact and engage with their websites based on events. This is a major shift to the Google analytics approach.
2. Google is using advanced machine learning that will automatically provide you with beneficial information about the behavior of the user. Now marketers can have accurate data without using cookies.
3. GA4 will start providing you data from Apps and Websites in a single place. If you have a business that has both a website and mobile app you can track their performance in a single place.
4. GA4 has very important baseline measurements. Pageviews & screen view were the only two default measurements in universal analytics. In GA4 scrolls, outbound clicks, site search, video engagement, file downloads measurements are available by default.
5. GA4 has three new metrics Engaged sessions, Engagement Rate, Engagement time to users’ interaction with the website. In Analytics, this user engagement was calculated based on the session duration and bounce rate.
6. One of the best new features in GA4 is called “enhanced measurement,” which automatically tracks file downloads, outbound clicks, video interactions, site search, and scroll events via the base GA4 tag. If you are not familiar with tags and this is the best way to track data. You can simply turn on enhanced measurement from the GA4.
7. Compared to Universal analytics the event tracking steps in GA4 are much simpler and flexible. No more stress about the event category, label & action in GA4. In GA4, there are 4 ways available for types of events that are tracked:
a. Automatically collected events
b. Enhanced Measurement events
c. Recommended events
d. Custom events.
8. Path analysis is a new technique in the Analysis section of GA4 that allows users to explore the paths that visitors take on their websites and apps. You can set up a path analysis from a starting or endpoint.
9. GA4 provides a special report of Debug view, When debug mode is enabled on your device, your data will be sent in Google Analytics in real-time only without processing it. This data will be filtered out and isolated from regular users who are also generating events on the website or app and hence your actual data is not inflated.
Since you’ve read the differentiation between Universal analytics & GA4 you will have a basic idea of the functionality of both platforms. The purpose of this blog is to introduce you to the new GA4 property. In this process below we have listed procedures to get started with GA4.
Here are a few steps you have to follow to set up the GA4 property.
1. Start with filling up basic information about account setup.
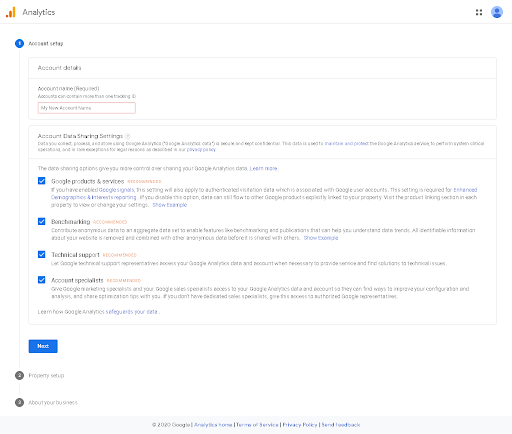
2. Tick all the boxes from data sharing settings. Data Sharing gives Google to access and analyze data to better understand users’ behavior, and use this data to improve Google products and services.

3. Property Setup – Here you have to add all the information about the website & details about the timezone & currency in which you want to track the data.
– Click on the New property option
– Enter website URL
– Choose industry type
– Select correct timezone & currency

4. If you want to create both Universal Analytics property and GA4 property it is still possible through the Advanced option

5. Select appropriate information for your business and click on create (this is optional)

After clicking on the create button you will have to select the stream from which you want to track data. As mentioned, we can track data from an iOS app, Android App and Web. We will show you the option to install GA4 on the web.

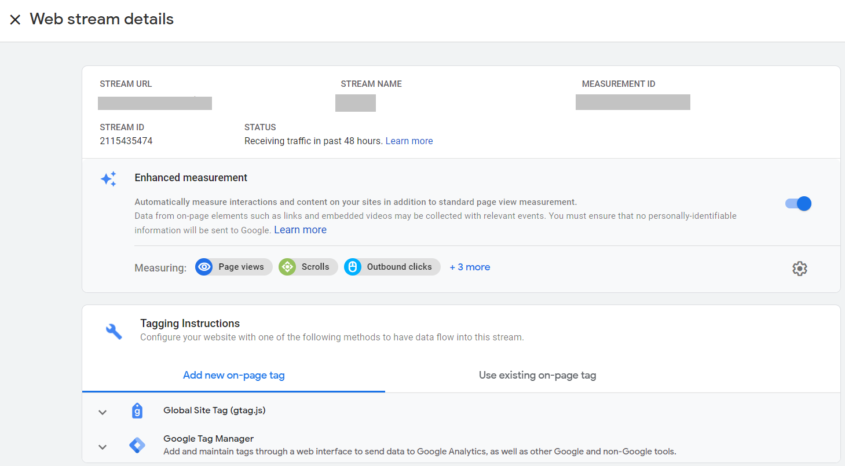
After adding the website URL and name this is the next step where you will receive a Measurement ID(this is similar to the UA-XXXXXX id we get in Universal GA properties)
Copy or make note of the Measurement ID as it is required for setting up the GA4 Configuration Tag in Google Tag Manager.
| Property> New Property > Fill property details > Business Details |
Our GA4 set up in the Google Analytics panel is done. Now you have to add the code or measurement id in your website backend and after that, all data tracking will start.
Upgrade To GA4
In case you have universal analytics and want to upgrade to GA4. Please follow the following steps
1. Open your Google analytics property and click on Admin.
2. After this you have two ways to upgrade to a GA4 property. You can either click on it to create a new property or you might get an option Upgrade to GA4.

3. Click on the Upgrade to GA4 option and click on Get started option.

4. Click on create a property. After this, your GA4 property will be created.

5. For GA4, To start tracking your you need to install a tag either via a Tag Manager (steps are added below) or adding a tag in GTM. For this click on the arrow on the tag installation section.

6. Click on your website’s data stream. And it will show up on this screen where you will get a measurement id. You just need to create a new tag in Tag Manager and your tracking will get started.
| Admin> Property> Upgrade to GA4> Create Property> Tag installation |
GA4 setting via Tag Manager
GTM is one of the free products provided by Google which you can use to manage many tags, including Twitter, Bing Ads. If there’s a tag that is not included in GTM, you can add your custom code via HTML.
GTM has a built-in tag for installing the GA4 measurement ID that makes it easier for us.
Below are the steps that you have to implement to GA4 code in Tag Manager.
1. Create a new GA4 tag. In tag, configuration select Google Analytics: GA4 Configuration.
2. Add Measurement ID from the GA4 property you created
(Find Measurement ID – Google Analytics>Admin>Property>Setup Assistant>Tag Installation>Data Stream>select your website>Measurement ID)

3. Check box of Send a page view event when this configuration loads.

4. Add All pages trigger to this tag. Save the tag.
5. All the set up is done. Enable the preview mode to test your changes using tag assistance
6. Make sure you are checking everything in debug mode and if it’s working correctly publishing it.
| New tag> GA4 Configuration> Measurement ID> All page trigger |
GA4 Tag in WordPress :
If you want to add the GA4 tag on your website using WordPress, follow the below steps:
Steps :
1. Log in to WordPress. Like GTM there are no fixed templates to add code to the website. For WordPress, you have to add a plugin to insert GA4 code.
2. Go to the plugin section in WordPress and click on add new.
3. In the search bar search for a plugin called Insert Headers and Footers. Install & activate this plugin.
4. Go to settings and select insert headers and footers. Now add the GA4 code in the Scripts in the Header section.

Quick Steps to get this code if you have already installed GA4.
- Login to your Google Analytics account & click on admin.
- In property, click on data streams. Click on your property name.
- This will show a Webstream details page. On this page, check tracking instructions
- You have 2 options available i.e. Global Site Tag (gtag.js)code and Google Tag Manager installation instructions.
6. Need to copy the Global Site Tag (gtag.js) code.

Now you have successfully installed GA4 on your website.
GA4 tag in Shopify –
In Shopify, we have to follow the same steps to get the Global Site Tag (gtag.js) code.
How to add code in Shopify backend –
1. Log in to your Shopify backend
2. Click on the Online Store option on the left-hand side.

(Tip: Before doing any changes in the code section of your website make sure you have a backup of the existing website.)
– To get backup of the code( Go to online store> Click on theme>Action>Duplicate)
3. Click on action & select edit code.

4. In the layout section, click on theme liquid.

5. In the theme code, look for the code. Below head place the code you have copied from the Analytics.

6. Now check the real-time report of google analytics to confirm if the data is right.
That’s it. It was this simple to populate data for GA4.