

How to Track Pageviews in Single Page Applications with GTM?
In this blog, we are going to share how you can track page views in Single Page Application with the help of Google Tag Manager’s History change trigger.
But before that, we need to understand why tracking page views in SPA’s is a task?
| Table of content 1. What is a Single Page Application? 2. Google Analytics Tracking Issue in SPA’s 3. History Change Trigger – the saviour 4. How to set up the History Change Trigger? 5. How to double-check if History change trigger is correctly implemented? 6. Summary |
- What is a Single Page Application?
SPA’s in the simplest form are apps that work as a single-page website and all the content completely loads inside the browser. It doesn’t need to send a request to the server each time a page is visited thus improving experience and usability.
Traditional websites using HTML & CSS send a request to the server each time a page is visited but that’s not the case with SPA. It uses AJAX (Asynchronous JavaScript and XML) — a method of exchanging data and updating in the application/website without refreshing the page.
SPA’s are completely rendered at the Client-side because whenever a user lands on the website or web application and interacts with internal pages, the page loads from the clients-end itself (basically from the user’s browser). The request is not sent to the server every time when a new page is requested, which in a way leads to having faster shifts that make the website feel more like a native app with a great user experience.
Some of the commonly used frameworks for developing single-page applications are React, Angular, Vue.js, Node.js, Ember.js, Aurelia, etc
With all these pros, SPA’s have their own set of issues out of which one is Google Analytics page views tracking.
2. Google Analytics Tracking Issue:
Since SPAs don’t send a request to the server each time a page is loaded, this doesn’t trigger the Google Analytics code added in the website, which in a way inflates tracking data of a user’s journey.
This inflates metrics like Page Views, Bounce Rate, Pages/Session, Exit Rate, and Avg. Session Duration in Google Analytics.
We’ll explain in short why these metrics are inflated:
- Bounce Rate & Pageviews –
Bounce rate is the percentage of all the single-page sessions. The reason these metrics will be inflated is even though the user will navigate to internal pages, the GA code will not trigger on each load.
Hence, GA only counts the first page viewed on the website, and as a result, it’s considered as a Bounced session, and as the internal page views will not get captured, you might see fewer numbers in your GA page views report. (Same reason for exit rate, and pages/sessions)
- Avg. Session Duration –
Avg. session duration is the total duration of all sessions (in seconds) / number of sessions.
This metric is inflated because of the Bounce rate. The reason is simple: all the bounced sessions have an average session duration of 0 and because SPA’s have more than the usual Bounce rate, this metric is impacted.
How can we fix this?
3. History Change Trigger – The Saviour
Google Tag Manager has a History change trigger that can help us to fetch page changes from history API and trigger the GA tag in order to track the pageviews of a website.
Adding a History Change trigger in your GA Tag in Google Tag Manager will capture the change in the URL via the History API.
What is the History API? – History API is a browser feature which allows you to go back and forth throughout the website and reload information, as it is saved under the history API of the browser.
How can we make use of it?
In simple words, this trigger is used when you want to capture a page change in SPA. (navigating from page A to page B).
This is the most simple and time-effective way to fix the tracking since the other option involves the web developer to make changes in the code!
4. How to set up the “History Change” Trigger in GTM?
Below are the steps to follow to add “History change” trigger for tracking page views in Single Page Application:
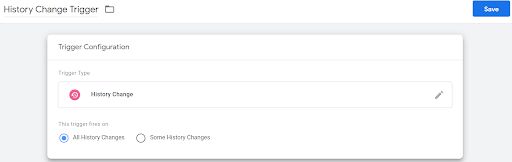
Step 1- To enable the trigger, go to Triggers > New and give some name to the trigger.
Step 2 – Click Trigger Configuration and select the trigger type as “History Change”.
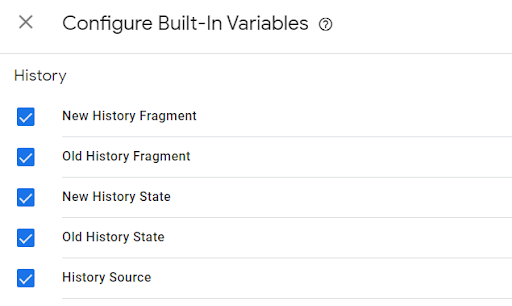
Step 3 – Save this trigger and move to the built-in variables tab to enable the “History” variables
Step 4 – Go to Variables > Configure > Select all the categories under History, as some variables are connected to this trigger.
Once you set these up, preview your website in GTM or refresh your debug mode to check the History trigger firing and variables
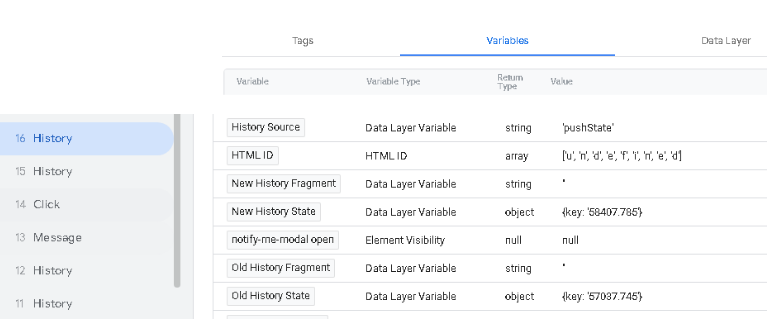
As you can see in the debug mode, whenever you navigate to an internal page, the “History” event is getting fired (which we will use to track our page views).
Along with this, the “History” variables which we enabled would also show you value in the variables tab. Out of all the History variables we enabled, we will use the value of “History Source” in our trigger condition.
Usually, the value in the “History Source” variable would be “pushState”, “replaceState”, or “popState” which signifies a page change in the browser.
In our case, the value is “pushState” which we will add in the trigger condition to fire our Google Analytics tag whenever a new page is viewed.
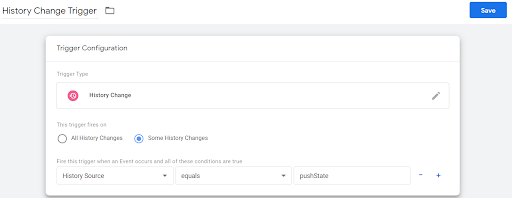
Step 5 – To set this up: you need to go back to the History Change trigger (which we created) and select the option of “Some History Changes”
Select History Source from drop-down “Equals” to “pushState”
(Refer the screenshot below)
Let’s save this and move on to the next step!
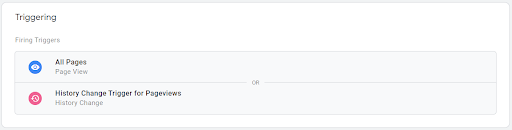
Step 6 – After setting up the trigger and variables, attach this trigger to the Google Analytics tag or create a new Pageview tag.
Go to Tags > Select your Google Analytics “Page view” tag > and add the history change trigger to that
Refresh and go to the preview and debug mode to check if the GA tag is triggering on page navigations.

This is how it will show up, every time you load a new page, you’ll get to see the number of times tag fired.
Once this is done, you will start getting proper data of your pageviews in Google Analytics.
Final step – To make the set up live, do not forget to submit and publish the version of your changes!
5. How to double-check if History change trigger is correctly implemented?
1. You can simply check it through the preview and debug mode while setting up the tags and triggers.
2. Google Analytics real-time data would also let you know the page view tracking.

3. Add annotation in GA and track the metrics we mentioned above over the weeks/months.

6. Summary
Fixing the pageview tracking issue through the code of the website with the help of a developer would be too time-consuming and your data would be inflated by then
However, through GTM, you can simply follow the above steps to track page views in the Single Page Applications.
Hope this blog is helpful. Feel free to comment your thoughts and queries.